When the shortest day is upon us there is a brief broodless period in the honeybee colony. This is the time conditions are right for oxalic acid treatment. There are two reasons for this:
When a colony is broodless, all the Varroa are at their most vulnerable out there in the open, either on the bees or creeping about on the comb – Varroa are protected from the effects of oxalic acid when they still inside the cells of the brood nest;
Oxalic acid can damage open brood so these effects are minimal when there are no or few larvae.
On December 9th 2013 the bees were flying quite strongly and still working the last of the ivy and the Mahonia but there has been little activity since then. Any eggs laid during that spell of mild weather will have hatched by the end of December so that might be the best time to treat.
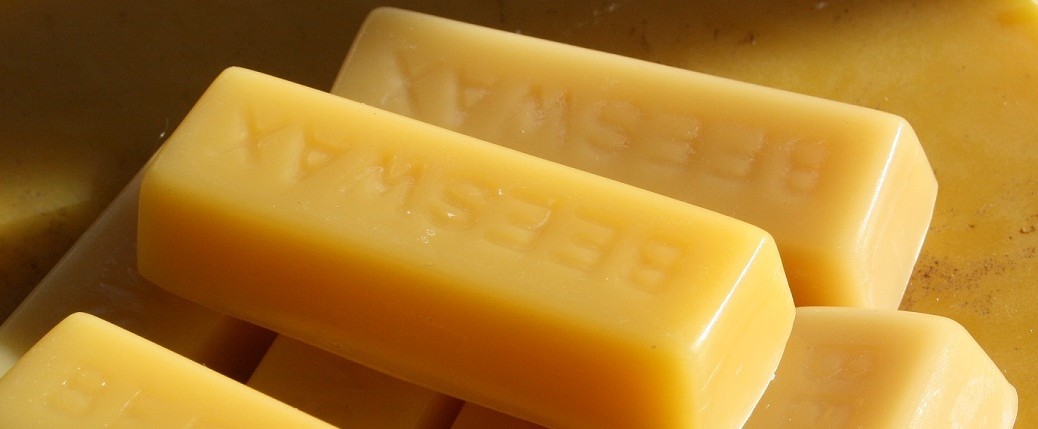
Here is a recipe for lip balm – it won’t help much with the beeswax mountain but if your lips are in tatters this is the stuff for you. If not, well it does have tatter-prevention properties if you smear some on before you go out in the elements. At the very least it will give you a nice glossy pout. Continue reading Lip Balm Recipe→
This is a really simple and nourishing handcream recipe – in fact you could probably eat it.
If you’re not planning to eat it you could add fragrance but it’s lovely as it is. Just apply sparingly as possible and try and keep it off your palms because it doesn’t contain those chemicals that make it vanish into your skin.
If you do get greasy palms – rub it on your head. Your hair will be glossy as a colt’s back and even on a very windy day – it’ll hold it all down nicely.
Weigh everything including the water.
Ingredients
50g spotlessly clean beeswax
200g jojoba oil
200g almond oil
200g soft water
10 g borax
Method
This will make 9 x 50ml pots so get them ready first;
Measure oils into a pyrex bowl;
Break up beeswax and add to oils;
Set pyrex bowl in pan of hot water and set on low heat to melt wax;
When beeswax is melted put water and borax into a jar, mix then warm this mixture so it is the same temperature as the oil etc;
Pour oil/beeswax mixture and boraxed water both together at the same time into a bowl and stir;
A creamy mixture will form and you need to get it into pots before it sets and it will set quite quickly.
This is a book for the winter; it is a slim volume – a mere 150 pages – but like a nutritious meal with plenty of fibre it requires time, concentration and a lot of chewing. When you read a book like this you realise just how little you know about bees – it really is packed with information.
He begins with queen rearing. Every aspect of queen rearing, from the selection of a queen rearing method, selection of starter and rearer colonies, queenright versus queenless, selection of eggs and larvae or queens and drones, even selection of the right bees for mini-nucs all is gone over with meticulous attention to detail, logical consideration and backed up with scientific study.
Detailed information on the mechanics of the various queen rearing manipulations is also supplied.
After pointing out the difference between queen rearing and bee breeding he moves on to consider which bee to breed from and points out that only breeding within a pure species will result in traits which are heritable. Good qualities often found in hybrids are not passed on reliably to the next generation so: “The starting point in breeding must therefore be the race, that is to say, a combination of genetic qualities sieved and tested by Nature herself.”
There is variability within each race, the performance of colonies can be evaluated and stocks either included or excluded from the breeding program depending on their characteristics. He gives six factors to be evaluated –
Honey production;
Spring build up;
Urge to draw foundation;
Absence of signs of inbreeding – gappy brood;
Gentleness;
Steadiness on the comb.
The identification of the chosen species is vital of course and much information is given on the methods such as observable characteristics such as colour, size and hairiness and less obvious features which can only be detected by more scientific methods such as wing morphometry.
I’m not going to go into wing morphometry here except to say that it is the study and and measurement of the veins and panels in the wings of the honeybee. From a distance this can look like a bottle of smoke until when you realise that these measurements are calibrated against those of preserved museum samples of bees from as far back as the Vikings – long before the importation of bees was thought of.
A chapter on bee genetics is never going to read like a bodice ripper but there should be a better way of getting this message across. Simply put – inbreeding is to be avoided or you’re going to get sluggish bees with gappy brood that don’t build up, can’t be bothered to go out to work and don’t overwinter with thrift or efficiency. Ring any bells?
This book is no walk in the park, nothing containing this level and amount of detailed information could be, but it is a vital reference-section occupant for the beekeeper’s bookshelf and for anyone serious about conserving their native bee it is essential reading – however difficult.
Personally I don’t think there is any need to insulate the roof spaces even if you are using mesh floors. And even if it turns colder.
I only did it one year – my first year with bees – I cut up one of those tin-foil survival blankets and put a piece over the crown board of each hive; it did no harm anyway. Since then we’ve had two very severe winters with temperatures below minus 12 degrees C at night for several weeks at a stretch and I lost hardly any bees. Bees are well able to thermoregulate so long as they have the stores – with or without mesh floors. Keep an eye on them and heft regularly. Try not to disturb them but if they seem to be close to the top of their stores put a cake of fondant over them.
If you make your own equipment it is possible to construct a hive stand which provides the hives with a 10cm deep ‘skirt’ which will prevent a lot of drafts.
The bees were very active over the weekend in the unseasonably mild weather. It is nice to see them so busy on the Mahonia and the late ivy, which is still in bloom here, but it is possible that it could scupper our hopes of a successful midwinter mite-cull. The bees will be bringing in nectar and little packets of fresh pollen which could get the queen laying. Should this occur then sealed midwinter brood would act as a refuge for Varroa and when we come along with our oxalic acid in a couple of weeks time they will be safely tucked away and the effects of the treatment will be minimal. Continue reading Weather Warming Warning→
After a day as cold and windy as today thoughts turn to cosy nights in by the fire with a good book. Here are some recommendations for beekeepers.
The first beekeeping book I ever read was Ted Hooper’s ‘Guide to Bees and Honey’ which is still the best book for beginners in my opinion. It’s so well written I sat down one week in winter and read it from cover to cover like a novel. The following spring I got bees and the fun began.
After a couple of years struggling with swarmy bees, I bought L.E.Snelgrove’s book ‘Swarming – its Control and Prevention’ which summarises the causes of swarming and the traditional means of prevention and also introduces the ingenious and adaptable Snelgrove board – a piece of equipment no beekeeper should be without. Continue reading Winter Reading→
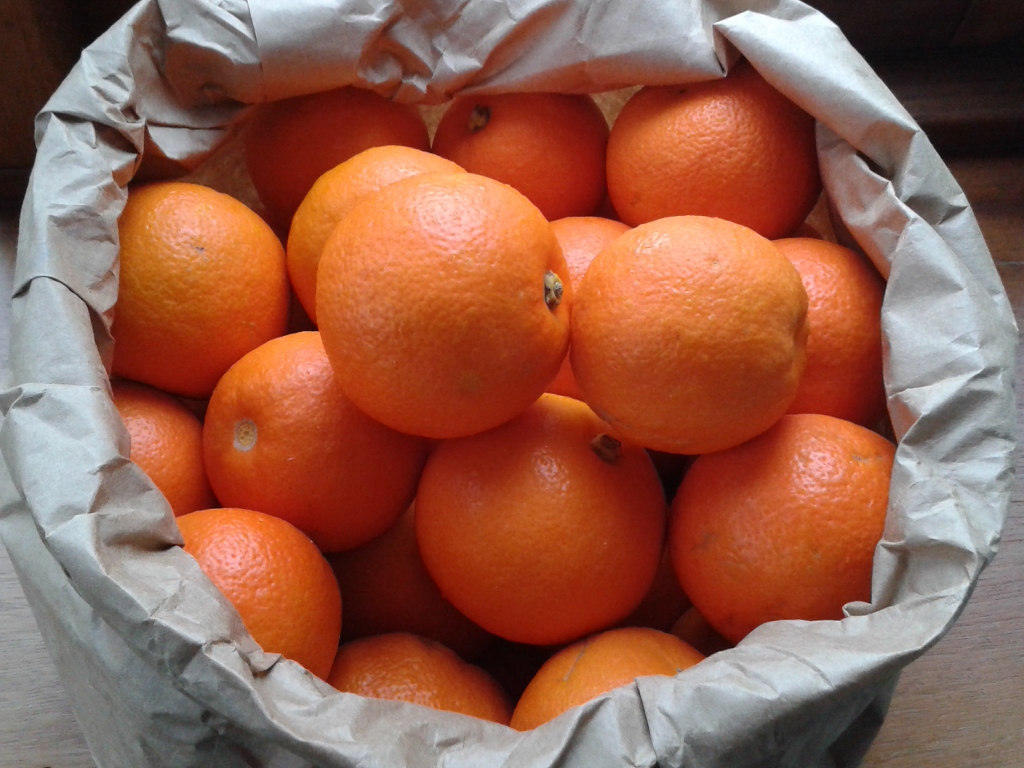
Mid-winter is the time to be thinking of marmalade.
If nothing else it’ll take your mind off that other old rubbish that happens towards the end of December.
Organic Seville Oranges
Seville oranges are in season from December to February so you’ve plenty of time to be thinking about it. If you have some indifferent honey you’d like to use up, here’s a good target – oranges and honey together develop a superb depth of flavour.
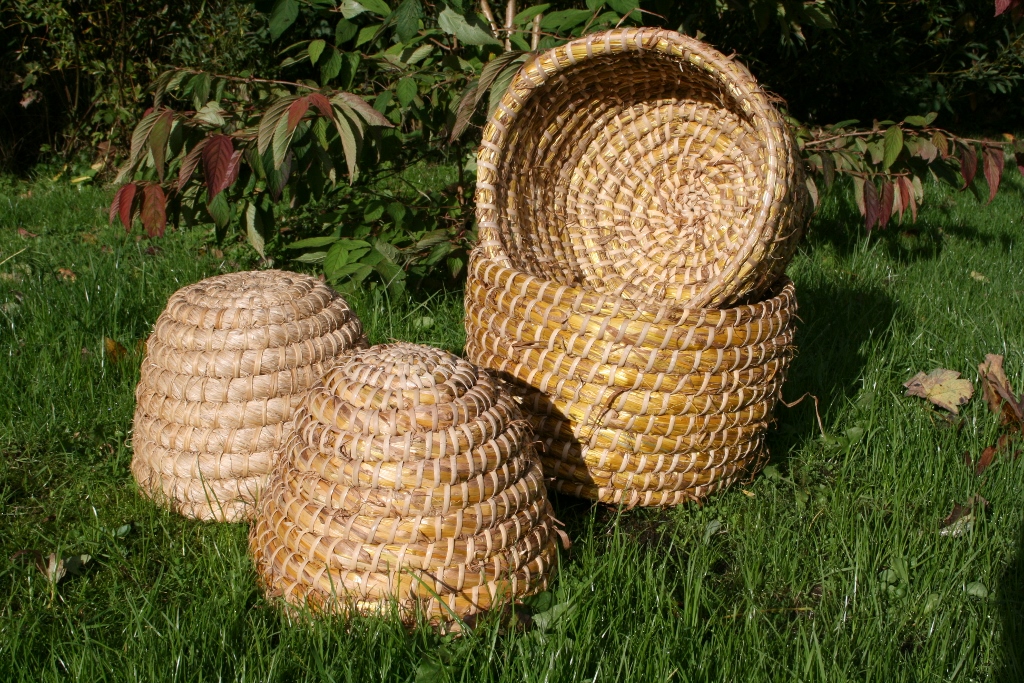
Once upon a time, all beekeepers would have made their own skeps using materials they could find locally. The theory of skep-making is simple enough: a length of straw rope, tapered at each end is coiled into a basket shape and stitched into place with a tough binding. It is a time-consuming and messy business though and should be done either outside in the elements of a warm, breeze-free day or in the corner of a garage or workshop. I should add that it takes practice.
Materials
There are two categories of materials:
the coil of rope forming the body;
the binding holding it in place.
A variety of different materials can be used for each, depending on what is readily available – selection below. Click image for close up.
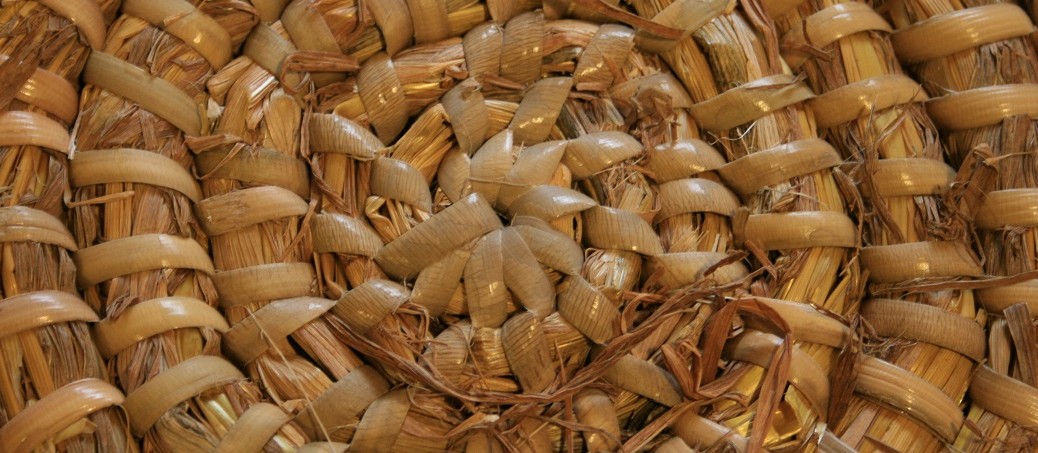
Small domed grass skep with blackberry binding, small domed oaten straw and lapping cane, two swarm skeps
The Rope
The rope can be straw, grass, rush and even heather – almost anything fibrous which is relatively long, tough and flexible can be used. Some materials are more durable than others and generally, the tougher the material the more difficult it will be to work.
Oat straw makes a good lightweight skep and was the most commonly used material in this far flung corner. Wheat or barley straw will also suffice you just need to find some with nice long stems.
Rushes such as the common soft rush Juncus effusus are soft and easy to work with but the central pith will take up atmospheric moisture and the skep will soon rot.
Purple moor grass,Molinia caerulea, is an exceptionally tough and durable upland grass found throughout Britain and Ireland and used for skep making in Scotland. There’s a lot of that around here so that’s what I started with. You can use either the leaves or the flowering stems and the plant obligingly sheds both in the autumn so you can go along and just pull it up by the handful. The leaves are nice and soft and easy to work but the flowering stems tend to be a bit brittle. They are easier worked if they are a little green when gathered but once dried no amount of soaking will de-brittle them enough to make them turn tight corners but they can be incorporated into the skep walls.
Whatever the chosen material for the rope, the binding would traditionally have been bramble or sometimes nettles.
Brambles aka blackberry or Rubus fruticosus were were traditionally used, probably because they grow almost everywhere and they are so tough but the preparation is labour-intensive: the fronds should be one year old growth and no older as the stems become woody and tough with age; these need to be cut in the late summer or early autumn and stripped of leaves and thorns before being split lengthways, de-pithed and stropped to improve their pliancy. Finally they can be hung somewhere cool and dry to season.
Nettles have their own problems.
There are modern alternatives. Jute or other hairy strings are convenient and cheap but their durability is variable and some sources suggest that the hairiness and the smell of oils used in their manufacture are irritating to the bees. Synthetic baling twine is the cheapest of all and can be used if you don’t mind blue (or orange) but it will degrade in sunlight and your skep may burst asunder at a vital moment.
Lappingor binding cane is a renewable rattan product from the Far East and is a reasonably priced alternative, there is little preparation and it comes in the post. If lapping cane is used, ideally it should be pre-soaked for several hours to increase its pliancy.
Tools
A bodkin or marlin spike to pierce the rope;
A section of cow horn or the neck of a plastic bottle to hold and funnel the material into a continuous rope of uniform thickness;
Scissors;
Tape measure;
Long nosed pliers.
Method
The skep is begun from the centre with the inside of the basket towards you. Work progresses outwards in a flat spiral then gradually the coils are directed upwards to make the walls, finally tapering off at the rim.
The first and most difficult thing to do is to get started.
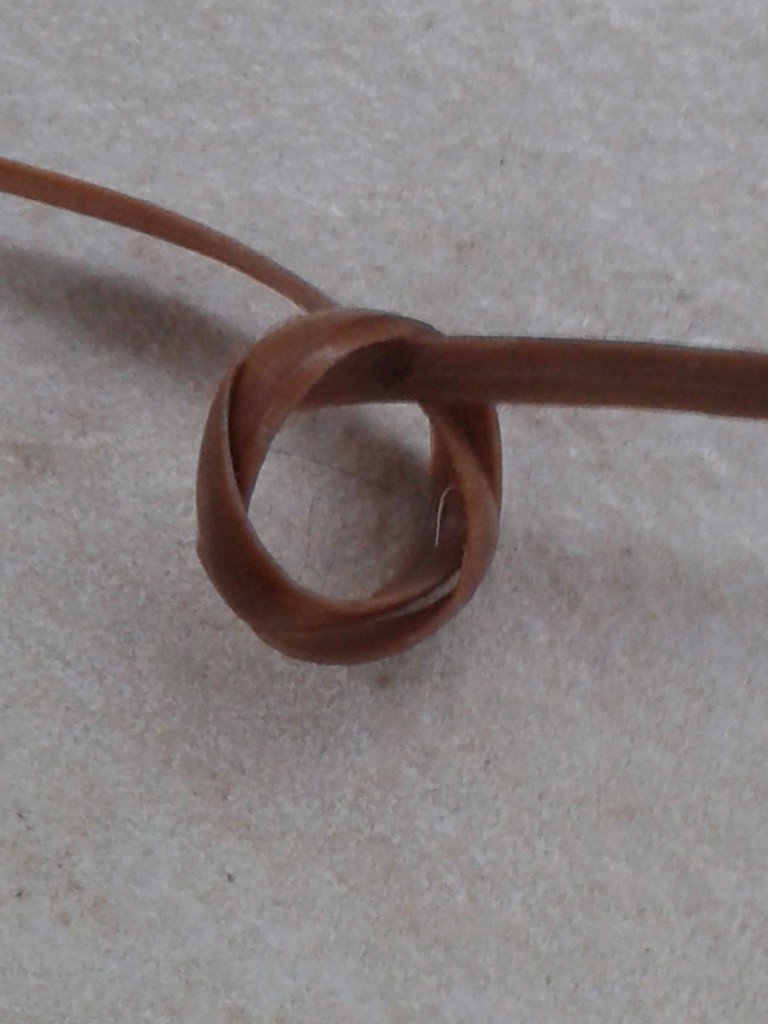
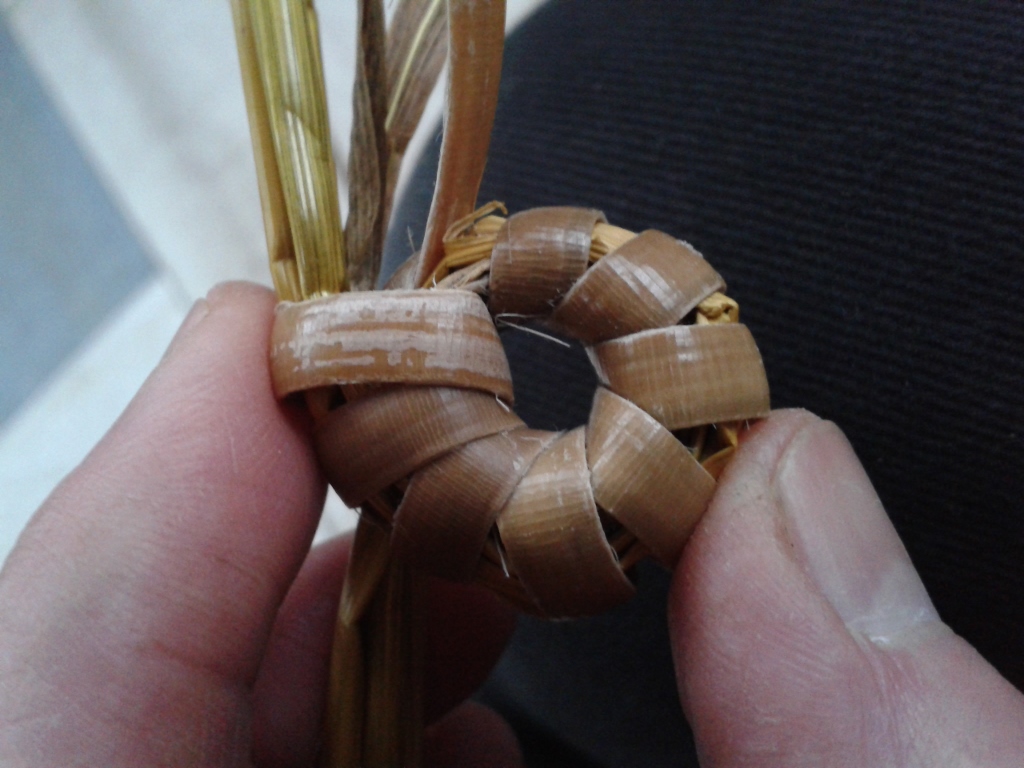
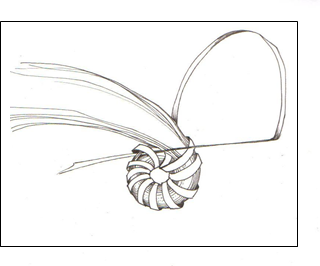
First take a soaked length of lapping cane and form a simple knot and – holding it this way up with the long end to the left…
Take 3 straws and, working with the thin ends lay them across the active length of cane (the one on the left) then bring the cane over and pass it through the loop trapping the straws thus;
You need to stop now and think because the direction in which you start the binding is very important – once begun it cannot be changed. If you are right-handed you will probably load material into your rope from the left, leaving your right hand to do the stitching. The inside of the skep is facing you;
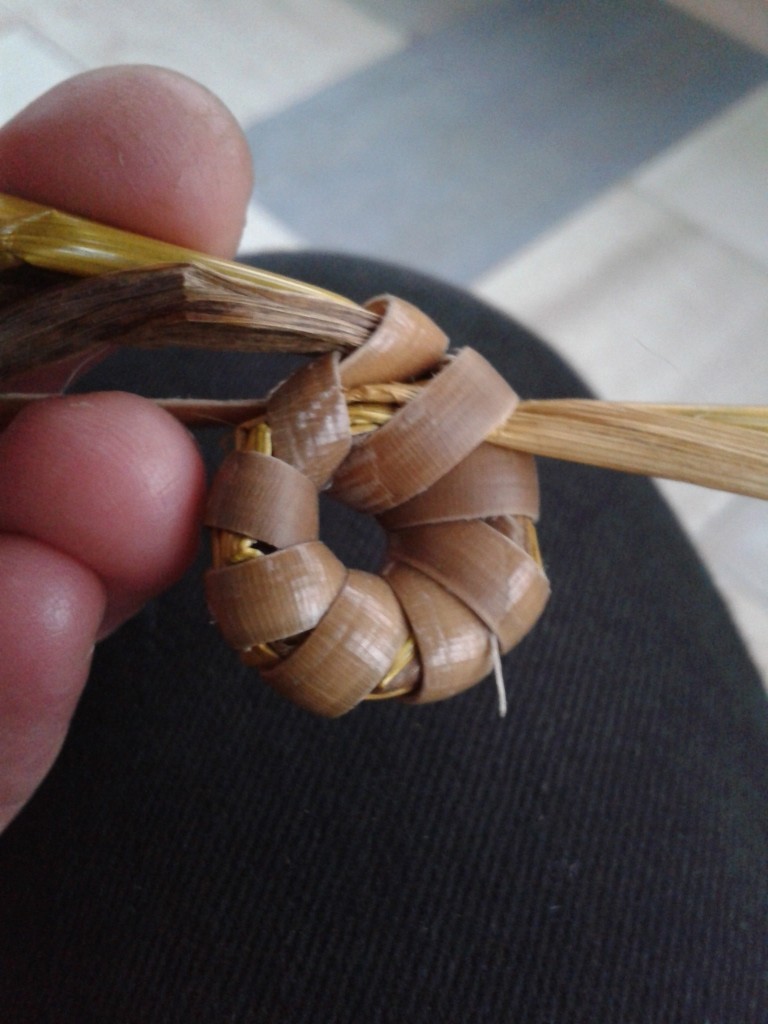
Continue binding the straws to the centre by passing the cane though the centre each time and slightly overlapping the previous stitch until you have completed a full circuit and it should look someting like this from the inside…And like this from the outside… an eyelet with the smallest possible hole in the middle.
You can now start catching the stitches of the previous coil and as you do so, you need to start adding straws – this time add them one at a time butt end first – push them into the middle of the others until they grip.
With the scissors, trim the working end of the cane to a point and use the bodkin to ease a passage beneath a stitch then push the cane through. Pull tight and repeat, binding the coils to one another as they expand.
Loading the rope is important. Keep loading one or two straws at a time, gradually building it up until it is thick enough to fit the horn or plastic guide. From then on it is important to maintain a snug fit in the guide by loading little and often. Do not allow the guide to become slack as this will introduce a weakness. Too tight and you’ll get a bulge.
Give the rope a twist as you go and this will further tighten the structure;
As you progress away from the centre, the stitches will become further apart so you should add stitches periodically by tightly circling the rope once with the lapping cane between stitches and holding it tight until the next stitch locks it into place. If you are making your own skep the size is completely up to you but generally a swarm skep has an outer diameter of about 14” and height of 10” and will take about a day to make. Harking back to grain measures – a 15”x10” skep holds one peck, or a quarter bushel, while one of 14”x15” will hold about 2 pecks – half a bushel. Which size you choose depends on your average swarm size – 1 peck or 2!
Start the walls about 2” before you have reached the required base diameter because it will take a couple of laps to round the shoulder fully. Up until now you have been binding coils one to another in a flat disc but now you need to change the both alignment of the coils, one upon the other, and the positioning of the stitches. Remember you have the inside of the skep towards you.
Finishing off is just a matter of finding the right place to stop so there isn’t a lop-sided look. Once that is decided, stop loading the rope but continue the stitching until the rope tapers off to a point then just tie off the end and thrust it out of sight.