When preparing a cake of beeswax for the show bench the general criteria are cleanliness and care but the show schedule should be consulted regarding other particulars especially the desired weight and dimensions. Assuming these can be satisfied then the beekeeper should proceed as follows.
But a word of warning – this is a right palaver!
The process involves 7 steps:
- Wax selection and harvest
- Rendering
- Preparing the show mould
- Cleaning the wax
- Pouring the mould
- Cooling
- De-moulding
1. Wax selection and harvest
Wax should be gathered from hives where there is not much propolis as this can darken it. Only super cappings should be used and these should be the cappings from clean, freshly drawn frames preferably of heather honey as these produce the finest whitest waxes. Only the best frames should be used and select at least twice as many as required to allow for disasters. These frames should be uncapped into a clean uncapping tray and the cappings left to drain. The following day wash the cappings in rainwater then spread them out on paper to dry. Or pile them into a pillow case, tie the neck and spin-dry!
When dry, you can pick through them for any foreign bodies or discoloured pieces. Be ruthless – if in doubt throw it out.
2. Rendering
First, render the raw wax down into a block using a Pyrex Jug in a water bath. Pyrex does not react with wax. The water bath can be as simple as a large saucepan. If possible, set the jug on low wire grid in the water bath to raise it off the floor of the pan. This is to prevent excessive heat at the bottom of the jug. Simmer gently to prevent splashes. Remove the wax as soon as it has melted and is runny enough to go flow through a fine cloth.
Finally run the wax through the fine cloth and pour into a mould or moulds.
You now have some relatively clean beeswax but it will contain impurities so those have to be removed and the cleaned wax cast into a suitable mould.
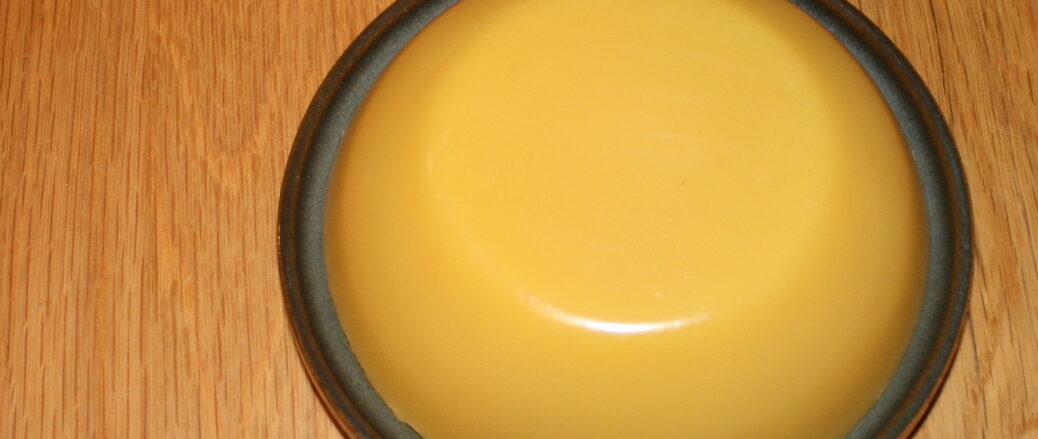
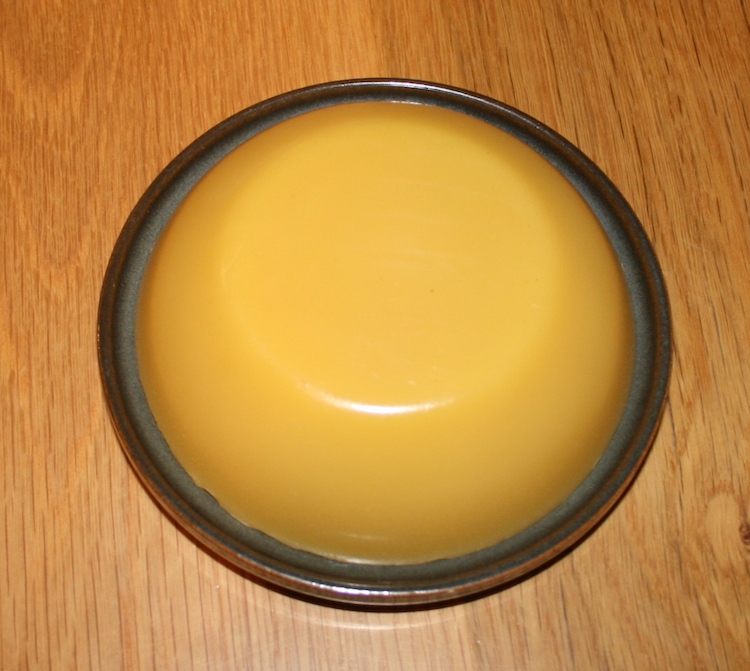
3. Preparing the Show Mould
A Pyrex or stainless steel mould is ideal and it should be carefully examined to make sure there are no flaws as these will show up in the cake.
The show schedule will give the required weight and any other criteria. So, you have the weight but how to get the right amount into the mould?
- Wax and water weigh approximately the same. Also, 1 fluid ounce of water weights 1 ounce 0r 100mls of water weighs 100g. So use a measuring jug and pour the measured water into the wax mould.
- Mark the water level in the mould on the outside of the mould with a waterproof marker or a little strip of duct tape;
- Next, place empty the mould in a water bowl – perhaps a washing-up bowl and hold it down with one hand while you pour in sufficient water to come just below the mark from step 4. ;
- Measure the amount of water in the bowl or reserve the water.
Next prepare the mould for casting by washing it thoroughly in hot water and detergent then dry it carefully on a linen cloth – linen being famous for being lint-free. Add 2 or 3 drops of both soft water and detergent (Padmore) or washing up liquid and glycerine (Williams) and rub all over the inside of the mould until it seems dry. Alternatively, spray with silicone – available from candle making equipment suppliers. Silicone makes everything slippery as fish.
4. Cleaning the wax
Dust, hairs, flies – all of these things will ruin your wax cake so be sure to exclude sources of these and set the time aside so you will not be disturbed. Turn off the phone. Exclude pets, children, nosy parkers etc. If you can, wear a white coat or at least an apron, and a hat too. Heat your oven to a low setting to warm your equipment.
- Start by re-melting the rendered wax in the Pyrex jug in the water bath.
- When melted, remove immediately and pour the wax through a very fine cloth into another clean, warmed Pyrex jug.
- Carefully clean the first jug immediately while it is still warm and keep it warm and dry. Or, if you are made of money, you could have a third Pyrex jug in readiness.
- Repeat, but this time run it through filter paper into the cleaned Pyrex jug.
- Each time you do this throw away the dregs as these may contain impurities.
- Cover the jug with cling film and keep it warm.
5. Pouring the mould
First heat the wax in the Pyrex jug in the water bath again, but not above 90ºC or the wax will denature. While you are doing this, heat the reserved water to about 66ºC and heat the mould and the glass lid in the oven until slightly too hot to handle. Use your imagination how to safely test this one!
You will be ready to pour when the wax is within 1º of 70ºC. Pour the reserved, heated water into the bowl. Float your mould in it and make sure it is steady. Then wipe the outside of the jug and gently pour a steady stream of wax into the centre of the mould taking great care not to splash or to set the mould rocking which would cause the wax to lap up the sides of the mould. Fill to the level marked on outside of mould from step 4 – it should come to rest on the bottom of the mould. Now look for any air bubbles and if you see any, quickly prick them with a warm skewer. Finally, place the hot glass plate over the top or the mould. This will keep the top of the wax mould hot and give a nice smooth, glossy surface. For reference, let’s call this entire arrangement of bowl of water, floating mould of wax plus the glass plate – the ‘Kit and Caboodle’.
6. Slow Cooling using the Oven Method
Ron Brown in his book ‘Beeswax’ describes a method of very slow cooling using the oven! Slow cooling prevents a cracking or a rippled surface.
First check the oven is level and if it isn’t – level it.
At an appropriate time, take two clean housebricks and place them in an old baking tin and put it on a shelf near the top of your oven. Check there is space on a lower shelf for the Kit and Caboodle.
Heat the oven to about 100ºC for about half an hour to heat the bricks, then drop the temperature to about 70ºC till you are ready. When you have got your bowl full of warm water, poured your wax into the mould and added the sheet of glass, turn off the oven and gently place the Kit and Caboodle into the oven and go to bed. But make sure you have turned the oven off.
7. De-moulding
In the morning, when the wax is completely cold, see if you can pursuade it out. If it won’t oblige, you could plunge it into a bucket of cold water and with luck the wax will float free although it might take its time. Or you could try putting it into the fridge, or even the freezer for a while.
When it does come out, handle it with great care. Dry it gently with a towel but do not rub the moulded side. The idea is to remove any loose bits and pieces that would otherwise come off on the judge when he is handling it without destroying the beautiful smooth surface.
Check carefully for any impurities, cracks, hairs or any other flaws. If it’s perfect give yourself a round of applause. Otherwise, prepare to do it all over again.
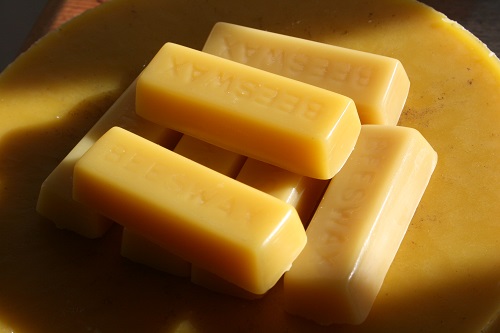
Transport to the show with great care preferably in a protective case and show on velvet (Williams).
Click here for how to render beeswax
Click here for the properties of beeswax
Click here for how to make mead from beeswax cappings
Calder,M. Recipes using Beeswax. Northern Bee Books. West Yorkshire. U.K.
Brown,B. Beeswax. Northern Bee Books. Scout Bottom Ln, Scout Rd, Mytholmroyd, Hebden Bridge,UK https://www.northernbeebooks.co.uk/products/brown-beeswax/
Hooper,T. Guide to Bees and Honey. Blandford, London. 1991.
Lindsey,F. About the Apiary. Wellington Beekeepers Association. 2001.
Manley,R.O.B. Honey Farming. Faber and Faber. London. 1946.
Padmore,F. Wax for Show (No.3). ).B.B.K.A. National Honey Show Publication. https://honeyshow.co.uk/shop/index.php/product/wax-for-show/
Witherell,P.C. Other Products of the Hive. In The Hive and the Honey Bee. Ed. Dadant & Sons. Dadant & Sons. Hamilton. Illinois. USA.
Williams,R. Beeswax for Show. In Bees, Hives and Honey – The Beekeeper’s Companion. Ed. Eddie O’Sulllivan.FIBKA. Ireland. 2000.
Thorne,E.H. Beekeeping Equipment. Wragby, Lincs. 2002-2003 http://www.thorne.co.uk