An Arnia hive monitoring kit, even at its simplest, consists of several components. The first thing you must do, before you take it to your bees, is fire it up and make sure all the constituent parts are working and that they are speaking to each other.
The set up isn’t difficult, the detailed instructions are clearly written in the User Manual but you wouldn’t want to do it out there in the weather with outraged bees. So here’s what you do. By the way – click any of these photos for a close up:
Kits may include one or more of the following:
- Gateway unit;
- Hive monitor;
- Basic Hive Scale;
- Weather Station.
Gateway unit
The Gateway unit gathers information from all the monitors in an apiary and beams them up to the Mother Ship once daily. The box on the left in the picture below is a Gateway unit – note the aerial. The box on the right is a weather station. I’ll get to that in a minute.
I successfully fired this one up here where the mobile signal is so pathetic we have to head for a particular spot in the yard to take calls but the Gateway manages fine.
To fire up the Gateway you unscrew the back plate and remove a plastic strip holding the batteries apart. After a couple of seconds a green light deep down inside starts to wink – job done. Replace back plate.
Hive Monitor
This is a hive monitor.
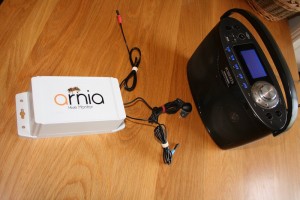
Note the three sensors:
- Red – this one takes the brood temperature so it needs to be slipped into the brood nest;
- Blue – measures humidity and has to be tucked between a couple of frames near to the back of the hive;
- The other one, directly in front of the radio, is a microphone and this one measures the bee noise levels – buzzing and flapping and ticking etc. It needs to be attached to close to the entrance. As we are in the middle of winter here – I’m going to tape it to the floor – it seems like the easiest option but I might change that when the weather improves.
Firing up the monitors is the same as the Gateway. Remove back plate. Remove plastic strip. Watch for winking green light. Replace back plate.
Basic Hive Scale
The Basic Hive Scale is a hive scale and monitor rolled into one. Click here for the video overview.
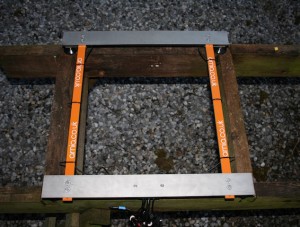
Assembled it should look like this from the top:
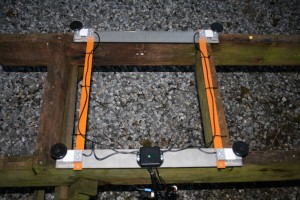
And like this underneath – load sensors, one at each corner, with screw-in-feet plus the wiring for the other three sensors:
The hive scale seems strangely bendy when you put it together but it is designed to be flexible to cope with wonky old equipment like mine. It can be adjusted horizontally to fit any hive stand and is also equipped with adjustable feet so it can be levelled if stand isn’t and lets face it they aren’t often.
The scale is designed with mesh floors in mind – it allows the bees to ventilate and the frass to drop through. Nothing worse than a build-up of hive-debris and associated moulds and wriggly wild life.
The feet screw into the load sensors but they should not be screwed so far in that they come up against the carcase as this would disable the sensors.
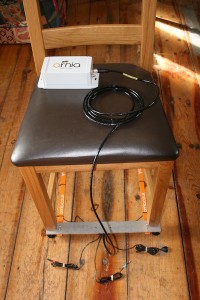
Here is the Hive Scale weighing a chair:
Note the three sensors on the floor – they are same as the basic Hive Monitor:
- Red for brood temperature;
- Blue for humidity;
- Microphone.
The Hive Scale is fired up in the some way as the Gateway and the Hive Monitor.
Click here for the video of how to assemble the Basic Scale Kit
Weather Station
If you are lucky you will also have Weather station. Lucky me.
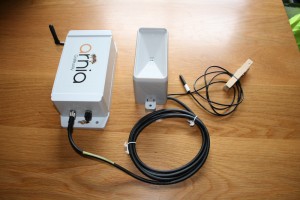
The box on the right is the weather station. It collects the rain and measures it before draining out underneath.
- The box on the left with Gateway written on it is the Gateway;
- The weather station is connected directly to the Gateway with the thick black wire;
- The other wire, the slender one with the white tip, is the sunlight monitor so its tip needs to be out of the shade in full light;
- The thing on the far right is a clothes peg.
The Gateway and the Weather Station can be screwed to a board and set out in the open. The weather station in particular needs to be out in the weather. I won’t explain why.
User interface
The User interface is located on the Arnia website. When you get your remote monitoring system this is set up for you. To check that your gadgets are all talking to each other and that the Gateway is sending the information to the Interface you just log in.
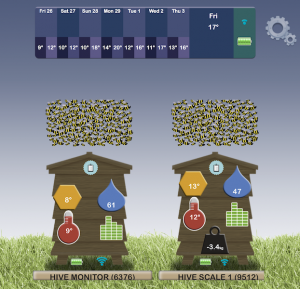
This is the screen that will greet you. Note the huge clouds of bees hovering over each hive – this is because the monitors have been listening with us to the very exciting General Election on the radio.
Each icon on the hive fronts lead to graphic displays of those things.
The bar across the top displays information from the Weather Station – note there is no sunshine data. This is because the weather station is still in the kitchen with the Gateway and the Monitors
A click on the cogs icon far right will take you to the dashboard.
The monitors screen (below) will show you whether the components of your system are speaking to each other. If they aren’t there will be no communication data here. Click this photo to see what I mean.
Installation
Once you are satisfied that everything is working ok then you are ready to install the monitoring system at your apiary.
Next week hopefully the weather and my torn knee meniscus will have improved sufficiently for me to do that.
Click here for more about Remote Bee Hive Monitoring and applications
Click here for How to Install your Hive Monitors
Click here for Arnia Remote Hive Monitoring – First Data
Click here for Arnia Bee Hive Monitors
Click here for a video overview of the Basic Hive Scale
Click here for video instructions on how to assemble your Basic Scale
Click here for How to Make your own Scale Hive
Click here for Bees, Honey and a Scale Hive
Click here for Remote Hive Monitoring Action
Click here for Useful Arnia Hive Scale Data
Copyright © Beespoke.info, 2016. All Rights Reserved.


Hi wondered what ever happened to Arnia monitors as I have found a hive with the scale on the base.
Interesting as I think the entire hive is part of the Arnia system as it has metal base frame to support the hive floor.
Hive was insulated and now eaten by the bees.
Wondered if you had any data to share.
I am the head of IoT at a large sustainability company so was interested to find this kit.